 If you notice…
At parties and social events…
Men are looking better each time…
Stepping up their style game.
Maybe you’re worried about keeping up.
However…
Don’t spend more money.
Spend more time on your tie – with acomplex necktie knot.
Why? Because details are powerful.
The more you enhance small parts of your outfit…
The more you will stand out.
It takes time to master these tie knots.
But it’s definitely worth all the praise, attention, and great conversations you’ll gain in the future.
Here are 3 stylish & sophisticated tie knots made easy.
Click Here To Watch The Video – 3 Complex Necktie Knots
Click Here To Watch The Video – Crazy Tie Knots Made Easy
Complex Tie Knots: #1 – The Eldredge Knot
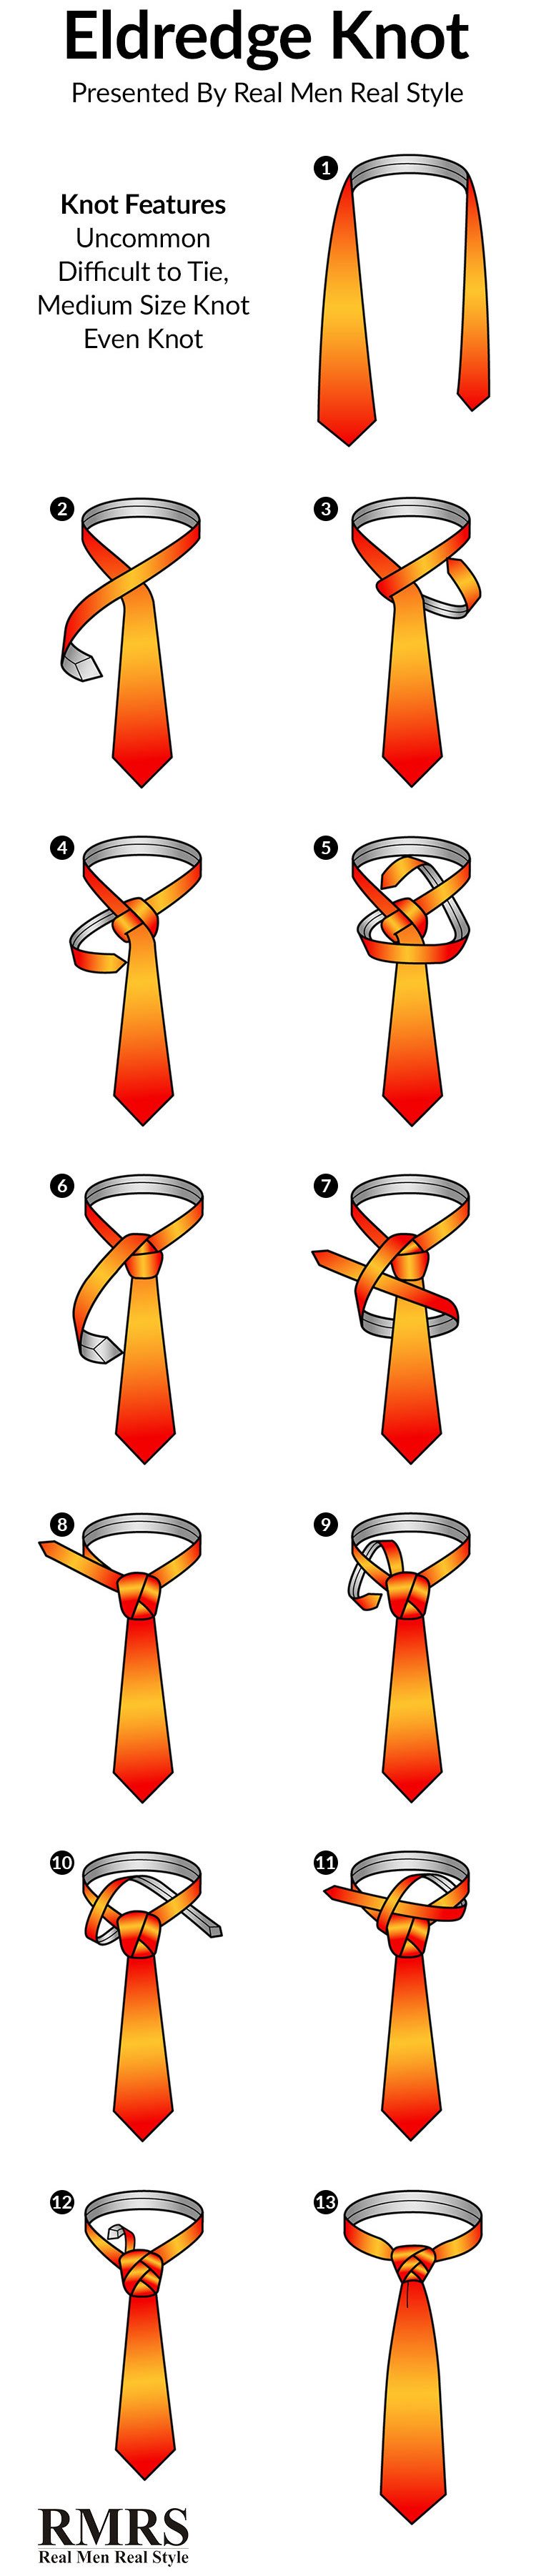
The Eldredge tie knot was invented by Jeffrey Eldredge, a Systems Administrator who got tired of wearing a Four In Hand knot to work every day. It’s characterized by its interesting shape: 4 diagonal bands plus one horizontal band, all layered over one another.
The style is asymmetrical and you’ll need a wide spread collar due to the size of the knot. And since the Eldredge knot looks “exaggeratedly extravagant” it’s only appropriate for casual and social wear. The rest of your wardrobe should be as simple and muted as possible.
Remember these tips before you begin tying this knot:
- Secure the top button of your shirt and raise the collar up.
- Ensure for each step that all the slack is pulled out completely. You will find it difficult to adjust an extra bit of slack the further along you get.
1. Drape the necktie around your collar, with the thick end on your right and the seam (backside) face down. Place the thick end exactly where you want it to hang when the knot is complete. Its position won’t change throughout the process.
2. Pinch the wide end of the necktie to form a dimple. Then cross the thin end in front of the thick end as horizontally as possible.
3. Wrap the thin end around the cross-shape, first crossing behind it from right to left. Then flip the thin end upward, crossing toward your face from left to right.
4. Tuck the thin end through the loop around your collar. It should emerge on the right side of the thick end, with its tip downward and seam exposed. You’ve now formed the smallest of the layered diagonals that will make up the shape of the knot.
5. Bring the thin end horizontally across the thick end, forming another horizontal band at the base of the knot. The thin end should be pointing to your left, with its seam facing inward.
6. Tuck the tip of the thin end up through the loop around your collar from the bottom. Flip it over the top of the knot, crossing diagonally downward from left to right. Pull it down firmly to form a diagonal band along the right side of the knot.
At this point, the thin end should be to the right of the thick end, with its tip facing downward and seam inward.
7. Bring the thin end around horizontally behind the back of the knot. Loop the thin end diagonally up and to the right, feeding it through the downward diagonal on the right side of the knot. You should finish with the thin end pointing up and to your right, seam inward.
8. Feed the thin end all the way through the diagonal loop and pull the whole arrangement firmly.
The knot should now have a diagonal band visible on each side, and a horizontal band visible beneath them. The diagonal on the right lies on top of the diagonal on the left, which lies over the horizontal band. The tip of the thin end should be pointed up and to your right, seam inward.
9. Aim the thin end of the tie straight upward, then tuck it down beneath the loop around your collar. You want it to emerge point-downward to the right of the knot, with the seam outward.
10. Loop the thin end of the tie up and around the circle around your collar. This will make a wider diagonal leg to the side of the central knot. Leave a bit of slack for this step. You’ll be tucking the end of the necktie through this new diagonal you’ve just formed later on.
11. Tuck the tip of the thin end down and to the left, underneath the loop around your neck. Flip the tip upward and toward your right, and feed it all the way through the diagonal you created when you came over the loop around your neck. Pull any slack out of the knot.
At this point, the thin end should be pointed up and to your right (emerging from beneath a diagonal leg on the knot’s right side). You should see the finished shape starting to take form. You now have 2 distinct diagonals on each side of the knot, with a horizontal band at the base.
12. Flip the thin end over the top of the loop around your collar. This should leave the complete structure of the finished knot visible.
13. Tuck the remainder of the thin end out of sight. Depending on how much you have left, this can be done either by tucking it straight down behind the thick end or by siding it horizontally around your neck (under the existing loop).
14. Take a moment to adjust each diagonal band until they all show roughly the same width. This will help the knot appear more even and symmetrical. Also, you can adjust the tightness of the knot by gently gripping its base with one hand and tugging down on the thick end with the other.
Guess what? Your Eldredge tie knot is ready!
Complex Tie Knots: #2 – The Cafe Knot
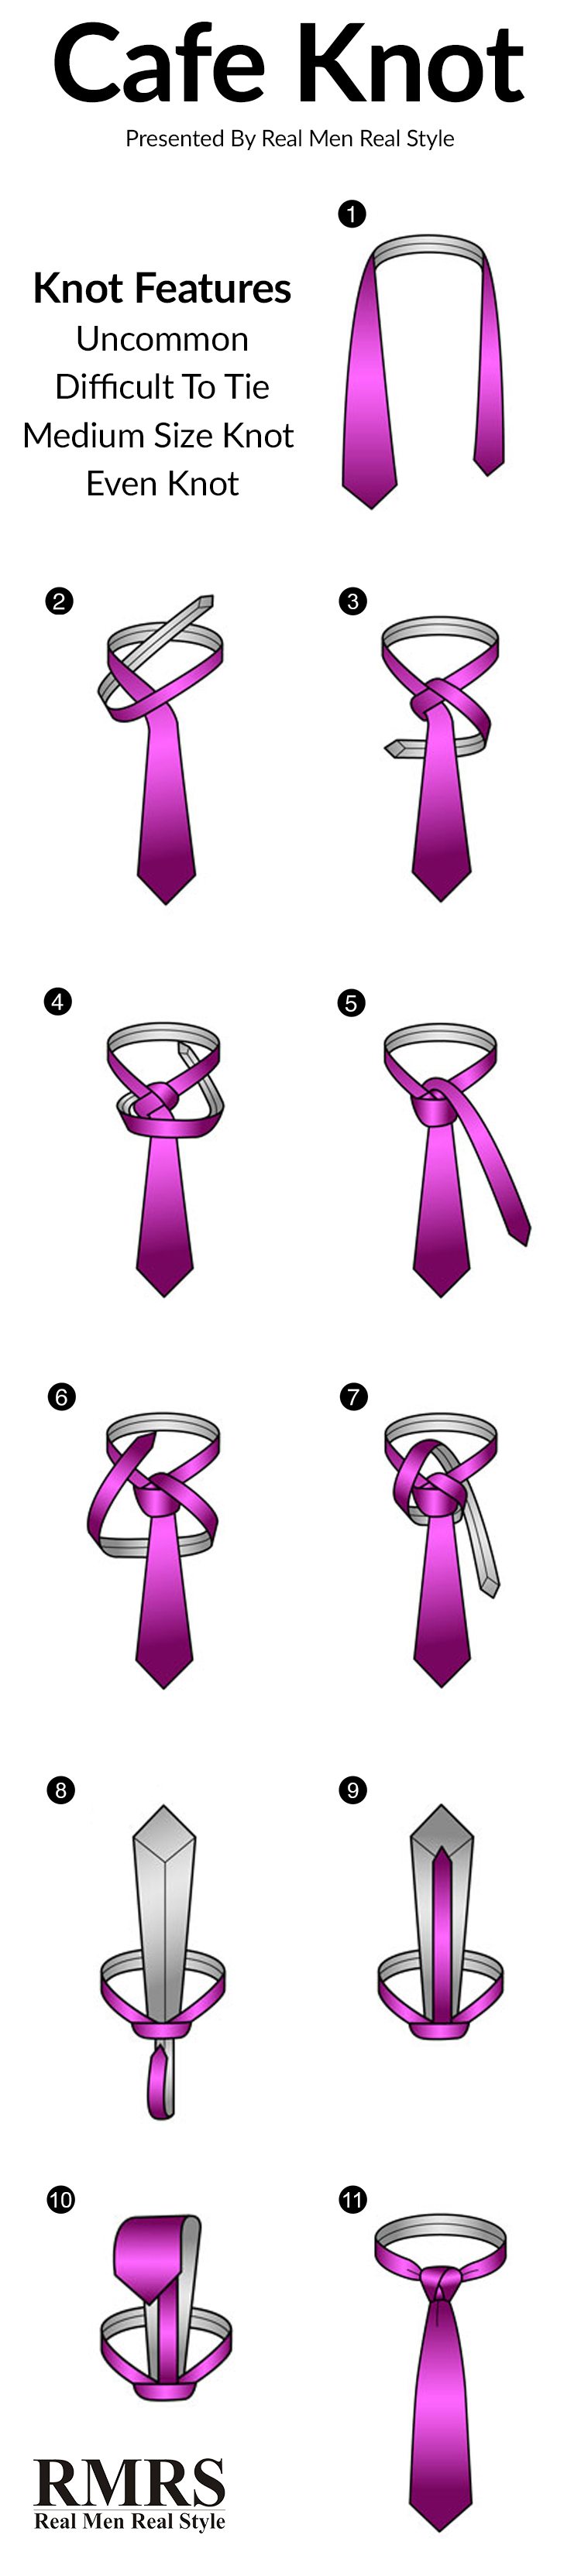
The Cafe tie knot isn’t for everyone. It was the trend for frequent cafe goers back in the early 1900s. It’s a stylish knot that draws lots of attention…so only the most committed of men can execute it.
You’ll notice it’s got a signature pair of “diagonals legs” which frame up the center – forming a sort of 3-piece triangle. You can match it with a nice casual suit or sports jacket but it’s only for social/ casual settings. It’s not meant for the office or formal occasions. As for the collar type, the point and button-down are the top choices.
Here are the steps to tying the Cafe knot:
1. Drape the necktie around your collar and over your body. Make sure the front side of the tie is exposed. The thick end should be hanging from your right shoulder, about a 1/2 inch lower than the level you want for the finished tie.
Note: it doesn’t matter if the thin end is longer or around the same length.
2. Form an X with the tie just below your chin. Make you’re crossing the thin end over the thick end. Use one hand to steadily hold the intersection point of the X shape. Then with the other hand, insert the thin end through the loop you just formed.
3. Flip the thin end over the top of the knot. At this point, the thick end is hanging down straight in front of your chest with its front side exposed. Meanwhile, the thin end is hanging to its left (also with its front side exposed).
4. Bring the thin end across the back of the knot, passing it from left to right. This will now make its seam (backside) exposed.
5. Fold the thin end and this time, bring it across the front of the knot, going from right to left. At this point, the tip of the thin end is pointed to your left and its front side is exposed again.
6. Bring the thin end behind the knot and insert it through the loop once more. This will leave a horizontal band across the front of the knot. The tip of the thin end should be poking from behind the knot and aimed toward the ceiling.
7. Flip the thin end over the front of the knot so that it hangs while pointing downward. At this point, the thin end should be lying on top of both the knot and the thick end, and it should be pointed downward just like the thick end. By now you’ve used up enough cloth up so the thin end should be 1-2 inches shorter than the thick end.
8. Bring the thin end slightly towards the left and then fold it behind the knot, passing it from left to right. This creates the first “diagonal leg” along the left side of the knot (which is essential to the style of the Cafe knot). The seam of the thin end is exposed once again.
9. Bring the thin end back in front of the knot, pointing the tip upward and toward your left shoulder. This creates the second “diagonal leg” that mirrors the first one. Insert the thin end through the loop, going behind the rest of the knot and emerging on the left side. At this point, the thin end is positioned slightly to the left of the thick end. The seam remains exposed.
The final shape of the knot is now visible: a small “horizontal leg” that’s framed by 2 “diagonal legs” on the left- and right-hand sides.
10. Tug the thin end firmly and take a moment to arrange the center of the knot. You want both diagonal legs to rise at the same angle, meeting squarely under your chin.
11. Now it’s time to move the thick end of the necktie. Flip it up and toss it over either of your shoulders (it doesn’t matter which one). The purpose is to expose the backside of the knot, which has a single horizontal loop that goes right across the back.
At this point, the thick end is pointed upward with its seam exposed, and all 3 legs at the front of the knot are hidden from view. The thin end is still hanging downward with its seam exposed. Get the thin end ready for the next step by folding it upward.
12. Slip the thin end through the horizontal back loop of the knot. It’s easy to identify – it’s the only horizontal piece you can see at the moment. This brings the thin end closer to the thick end, with the seams touching. Pull the thin end all the way through the loop. At this point, it should be shorter than the thick end.
Looking in the mirror, all you should see now are the 2 ends (belly-to-belly against each other) and the horizontal back loop.
13. Flip both ends of the tie back down. You’ll see the three-legged front of the knot reappear, and both ends of the tie should be pointed to the ground.
Your necktie is now 95% ready. The triangular shape is visible, and both ends are hanging beneath it, with the thin end completely hidden from view.
14. Tighten the whole thing carefully. Since the thin end is the working end (which is unusual in neckties), you adjust the necktie by holding the knot with one hand while tugging on the thick end with the other. Tighten until the knot is snugged well against your neck, then adjust the tie loop until the knot is centered.
15. Slip the thin end through the tag or loop that’s found on the backside of the thick end. If there’s not enough length for this, use a tie bar to hold the ends together.
Congratulations! Your Cafe tie knot is ready for action.
Complex Tie Knots: #3 – The Trinity Knot
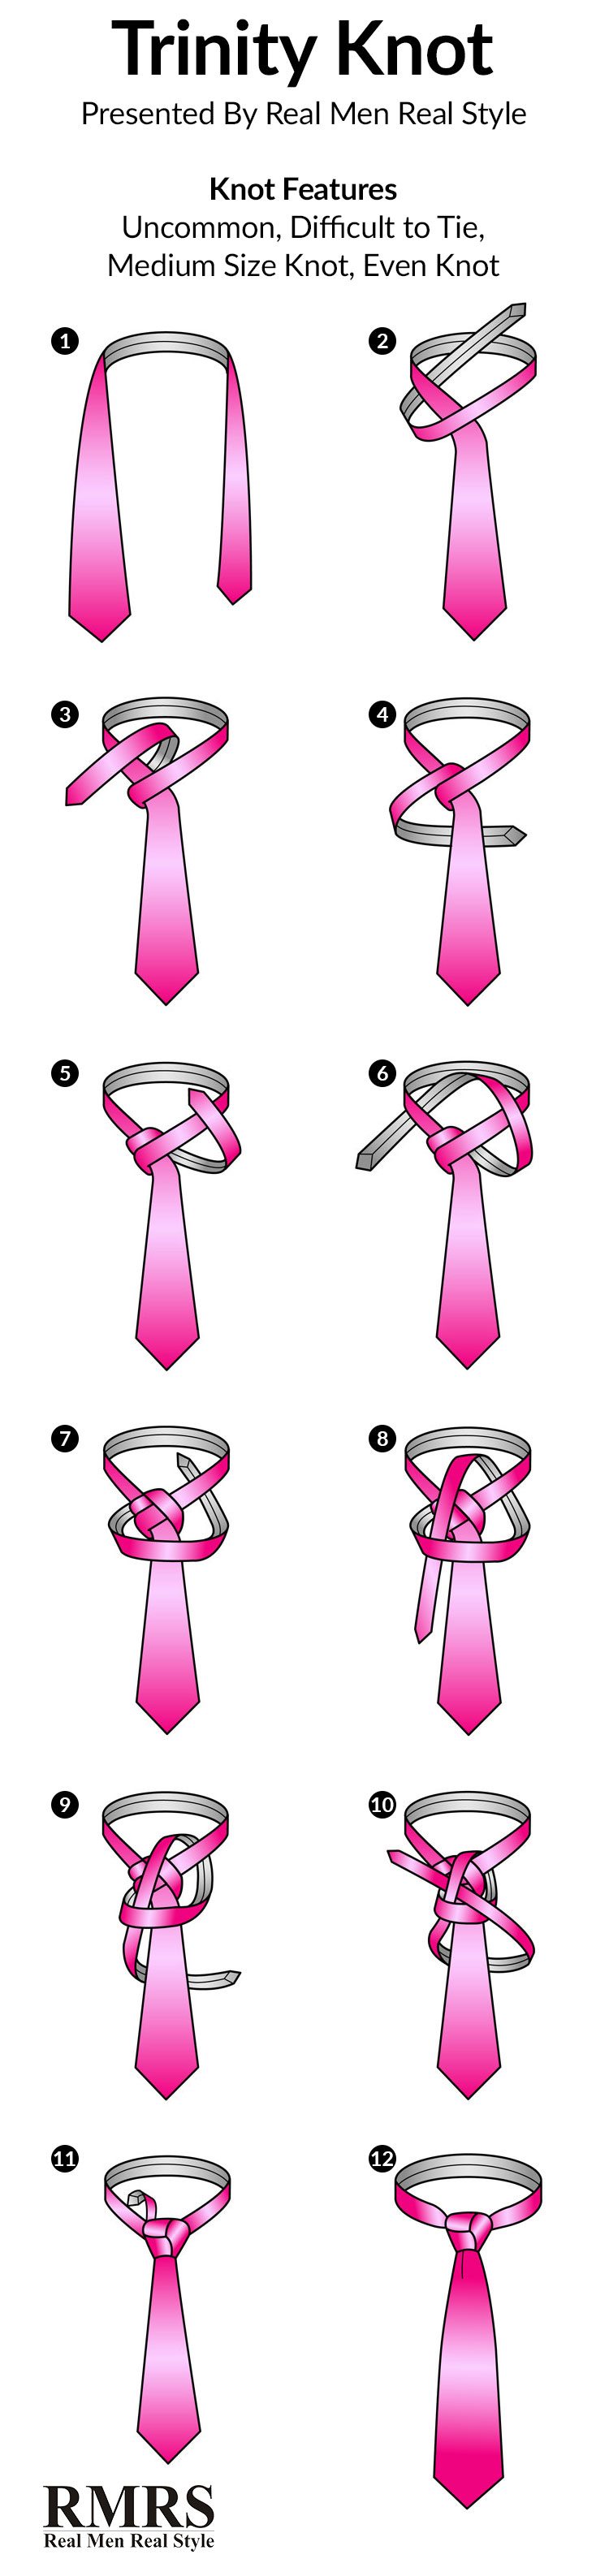
If you’re bold and confident enough to wear something that makes you stand out quickly…the Trinity tie knot might just be for you. It’s a trefoil-shaped, symmetrical knot with 3 axes that meet in the middle (rather than one vertical axis down the center).
Since it tends to look too “busy” and “show-offy”, the Trinity knot isn’t recommended for business wear or conservative environments. You should also balance out its flashy style by choosing a relatively plain necktie that isn’t too thick.
Are you up for the challenge? Follow these steps below:
1. Drape the necktie around your collar with the seam facing inward. The thick end should hang on your right and the narrow end on your left. You tie the Trinity knot with the narrow end, so make sure the tip of the thick end is hanging exactly where you want the finished product to be. The thick end will remain in this position the entire time.
2. Cross the narrow end diagonally in front of the thick end, forming an X underneath your chin. Tuck the narrow end around and up underneath the loop around your neck, bringing the tip upward from beneath your chin (with the seam facing outward).
3. Flip the narrow end back over the top of the loop around your collar (still to the right of the thick end). The narrow end should now be pointing tip-downward and seam-inward.
4. Pass the narrow end horizontally behind the thick end. You should finish up with the narrow end pointing to your left, with the seam facing outward.
5. Flip the narrow end over the top of the loop around your collar (so that the tip points upward and the seam faces inward).
This is where things get more complicated. The turns you’ll be making will form the visible part of the knot, so make sure to pull the slack out and smooth the surface of the necktie for each step.
6. Feed the tip of the narrow end down and out underneath the loop around your neck (on the far right side of the knot). This means crossing over and above the bulk of the knot. If you’ve done it right, you should finish this step with the narrow end emerging from underneath the loop around your neck – tip-downward and seam-inward – to the right of the thick end.
7. Bring the narrow end horizontally across the front of the knot from right to left. Slip a finger underneath the horizontal band this creates. You’ll be passing the necktie underneath it later on. You should finish this step with the tip of the narrow end pointed to your left, seam-inward.
8. Bring the narrow end up underneath the loop around your collar. This will be the second time you’ve passed around the collar loop in the same spot, so don’t be alarmed if the cloth is starting to stack up. Pull the tie on through so that the narrow end is pointed upward beneath your chin (emerging from behind the knot) with the seam facing outward.
9. Turn the tip downward and feed it through the horizontal band you created in Step #7. You should end up with the tip of the narrow end pointed straight downward, lying on top of the thick end.
10. Do NOT pull all the slack down through the horizontal loop at this point. Instead, slide a finger underneath the narrow end just above the knot, right where it doubles over to feed down through the horizontal loop. You’ll be feeding the necktie back through this new loop later.
11. Pass the narrow end around behind the thick end from right to left. You should complete this step with the narrow end pointing to your left, seam-outward.
12. Feed the tip of the narrow end up over the loop around your collar, and through the small vertical loop formed in Step #10. The tip of the narrow end should be angling diagonally upward and to the right, seam-inward.
13. Pull the narrow end all the way through the vertical loop (still angling diagonally upward and to your right) and snug it down. At this point, the 3 folds of the completed knot should be visible.
14. Pull all the slack out of the knot. Adjust it as necessary to make the 3 visible folds identical in size and angle. You can hide whatever remains of the narrow end by either pulling it straight down behind the thick end or by tucking it flat underneath the loop around your collar (if only 1-2 inches remains).
15. Spend a moment to straighten the folds and get rid of any remaining slack on the knot.
Note: you can tighten the knot by pulling down gently on the thick end. But do this carefully and adjust the folds as you go. If you yank down hard on the thick end, it can distort the shape of the knot.
That’s it! You can now wear a Trinity tie knot and show it off to everyone at your next party.
Also read:

 Ultimate Guide to Wedding Attire For Men
 ULTIMATE GUIDE To Men’s Hair Types
 How to Cut Your Nails Properly
") How To Dress For Your Age (20s, 30s, 40s, 50s+)
How To Dress For Your Age (20s, 30s, 40s, 50s+)") Last Minute Holiday Gifts Ideas (For Men Who Are Hard To Buy…
Last Minute Holiday Gifts Ideas (For Men Who Are Hard To Buy… 10 Watch Styles Every Man Should Know